How to Change the strings on your Steel String Acoustic Guitar
Author: Artist Guitars
Hi, my name is Ian Bush, and welcome to another video from Artist Guitars.
Today I will show you how to change the strings on a steel string acoustic guitar using the Artist JB300.
Firstly, lay the guitar down on a soft surface. It's important that you change the strings one-by-one, and then tune them back up to pitch. Let me explain why.
On a typical guitar, the strings have about 200 pounds of pressure, and the truss rod has about 200 pounds of pressure the other way. If you take all the strings off, what happens is the neck bends up, causing a back bow. You don't want this to happen. What you do wanna do is keep the right amount of pressure on the neck at all times by only changing the string individually. Be careful not to use anything like side cutters to remove the strings all at once.
So let's start with the E string. The low E string is the fattest string. To loosen the string, turn the machine head clockwise. A good way to check that you're loosening the right string, is to play it at the same time you're moving it. You can hear that the pitch is going down. It's a common problem for beginners to mix up the machine heads, so make sure to take this slowly.
Now that the string is loose, you want to remove it from the machine head.
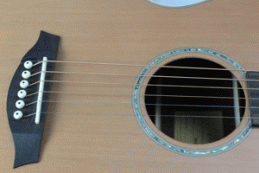
Next we're gonna remove the bridge pin. Now, if these have been installed correctly they should come out very easily, but it's common for people to wedge these in, making it difficult to get out. To get them out, you might need to use a bridge pin remover, which is often on the end of your string winder. But, if you don't have a string winder, you can use a coin. Place the coin against the other bridge pin and just pry it up. If you do break a bridge pin in the guitar, the easiest way to fix this is take all the strings off, and push it up from the inside out. But avoid this if possible.
Now, take your fresh string and check the labeling to make sure you have the low E. A good thing to know is that the thickest string is low E, and smallest string is the high E. To install, take the ball end and make a small bend. Put the string into the bridge, and place the bridge pin gently on top. This is the bit that most people get wrong. You wanna pull back on the string and gently push the bridge pin in. What you're trying to do is get the ball end of the string to rest on the wood of the bridge plate. You don't wanna wedge it in. A good way to tell, is you should be able to move the bridge pin up and down, without the string moving too much.
Moving to the top of the guitar, we now need to wind the string onto the machine head. To do this, firstly, the string needs to be trimmed. Measure three to five centimeters past the machine head, and cut. For each string gauge, this will be slightly shorter, however, this is just an approximation. Now insert the trimmed string into the hole on the machine head post, and slowly wind the string into the machine head counter clockwise. It's important to note that the string should be on the inside of the machine head, as you can see whilst I'm winding this on. I'm also putting some tension down on the string so that it goes onto the machine head underneath the hole tightly and is lined up correctly. You should be aiming for three to five winds of string on the machine head. Now keep going until you can play a very low-pitched not. Then we will grab our Artist Guitar Tuner and tune the string to the correct pitch.
I'm gonna use a tuner here, but it's actually easier if you listen to the note. We have other videos you can use, but for now I'll play a low E. As you can hear, we were very low but now the notes are very similar. We'll now use the tuner to get it just spot on.
This last step is very important for tuning stability. Once the guitar has been restrung and tuned to correct pitch, we need to stretch and retune the strings. The reason for this is that as the strings have been installed, it's possible that there are small areas where the string is not sitting perfectly, resulting in a small area of uneven tension. When you play the guitar later this will result in the string going out of tune very easily. Follow this to avoid that issue.
All you need to do is pull the string up and retune. You need to do this two to three times. When you've done this correctly, after stretching the string you'll find very little change in the pitch of the note.
I'd also like to point out that as I get close to the note, I'm slowing down so that I just get in tune and I'm not going past the note. The reason you do this, it's better for tuning stability to always tune up and never down. If you do go too far, tune back down below the note and then back up to pitch.
Thanks for tuning in to another video from Artist Guitars. Check the description for links to more information on the items used in this video, and leave a comment if you have any questions.
Find out the best way to change your strings for optimum tuning & stability
Learn how to change strings on your acoustic (steel string) guitar like a pro! This article will show you how to do a perfect string change. Check out how to change Classical guitar strings here.
When you change your strings be careful to keep your guitar in tune at all times, and replace 1 string at a time (1 by 1). Your guitar likes to be tuned, if you take off all the strings it can affect the neck.
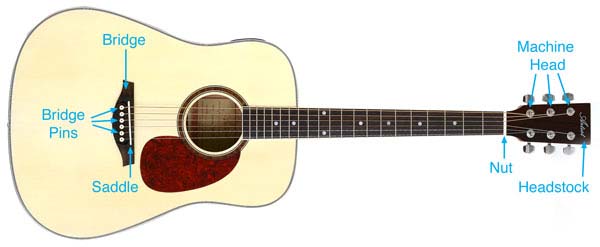
Here are the parts of the guitar you'll need to be familiar with:
1. Lay it Down
Lay your guitar down on a nice flat surface (a desk or table is often a good place).
2. Remove one string at a time
Remove just one of your strings (it's really important to do these one at a time). Keep loosening the machine head until the string is completely loose. When the string is loose, you can just unwind it from the machine head. Pro tip - use a string winder, a string winder will make this step a lot easier and quicker
3. Bend the End of the String
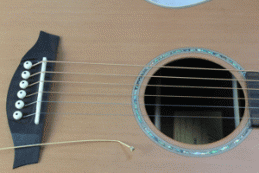
Now take your new string from its packet and bend the end of the string. This prevents the string getting caught under the bridge pin. The role of the bridge pin is to hold the string in place, but the strength of the string actually comes from the string touching the underside of the top of your guitar. You should never need to force the bridge pin in — if you do, it makes them very hard to remove.
4. Place the String into the Bridge
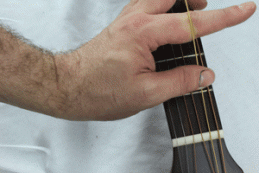
Place the bent string into the bridge and gently push the bridge pin in. You can then pull back on the string (see picture below) to make sure the string is securely connected to the soundboard. If the bridge pin comes out when you do this, you might need to bend the string a little more, or just hold the top of the pin when you pull back on the string. Just remember to never wedge the bridge pin into the bridge as this will make it really hard to remove when you change your strings in the future.
5. Cut the String to Size
Now you have to work out how much of the string you need to cut off. Lie the string flat on the guitar and go 8cm past the machine head. the goal is to get 3-4 turns on the machine head. If you get too many of too few turns it will make it hard to keep in tune.
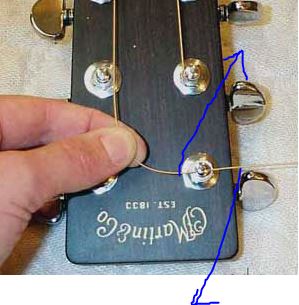
6. Bend it like KISS
Now put the string into the machine head, extend the string to its full length, and hold it there with one hand. Now with your other hand grab the string at the nut and pull it back approximately 1.5 - 2 frets back. Now make a 'crooked S' bend where the string is in the machine head. This will give the string its 'locking' bend, like the 'S' in the "KISS" logo:
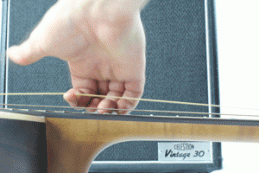
7. Apply Tension
Use your hand to make sure the string has tension while it is still loose. This helps the string go on nicely and neatly. Tune your string up to pitch (when the slack has been taken out of the string you can remove your hand). Try and make sure the string doesn't go through the nut while you tune as it will wear the nut down (and may eventually make it too low).
8. Cut off Excess
If you have done everything correctly, the string will be in tune and you will have 3-4 turns of string on your machine head. You should now cut off the excess string as close to the machine head as possible so that it can't hurt you.
9. Play, Pull, Play, Repeat
Now this is the critical step to a perfect string change. Play the note, then pull on the string and play the note again. Does it sound like the string is lower in pitch? If it does you have some slack in your string and you need to remove it. Pull on the string again and test it to see if the note changes pitch at all, you might need to do this 3-4 times.
Congratulations! You now know how to change your strings like a professional!
.gif)