
Our acoustic and classical guitars are made with high-quality materials and construction, so if looked after and maintained well you can enjoy your new instrument for many years. Taking good care of your gear and observing a few general upkeep practices is the best way to extend the life of your instrument, plus your guitar will play and feel better.
Neglecting to clean and take care of your gear can cause drastic failure, and you’ll find that very little effort can go a long to way preserve your guitar. Putting a little effort into general maintenance can also save time and money in the long run.
The strings are probably the easiest thing to take care of on your guitar, and they are certainly the most important - you’ll have a hard time playing without them! We all sweat and secrete natural oils from our fingertips, which can build up on the strings and cause breakage sooner, make the strings feel sticky, rusty, or sharp, and eventually dull your tone. The easiest way to mitigate this is to simply wipe down your strings with a soft cloth before and after using the guitar, and try and play with clean, dry hands.
It is best practice to change your strings frequently. The amount of time left between changes will vary depending on your individual needs are as a player, but if there are dirty or rusty spots, kinks or any sharp areas on the string it is definitely time for a restring. We have some fantastic resources to help you change your strings if you need some guidance.
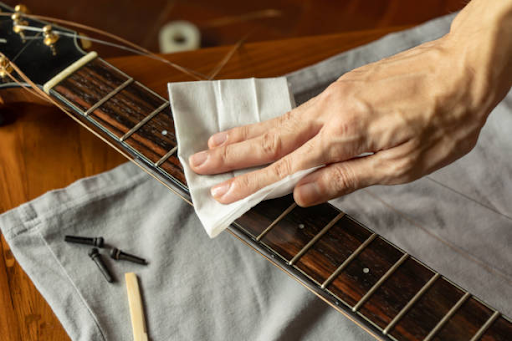
There are many types of frets and fretboard materials, and learning how to keep these in good shape will make your guitar feel much better under your fingers! Just like with strings, keeping your fretboard clean and free from grime is very important.
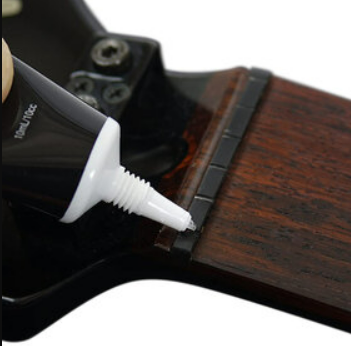
Darker exposed wood necks such as Rosewood or Laurel can benefit from occasional oil treatment to help retain some moisture, and if your fretboard is particularly dry or showing signs of cracking consider oiling and conditioning your fretboard. If your fretboard is made of maple, or if it has a lacquer finish, you do not need to ever use oils, just a wipe down with a soft cloth when you’re strings are off will suffice.
Frets shouldn’t need too much upkeep, but they will wear down over time. Keeping clean and fresh strings without rust will ensure that they last longer, and occasionally polishing and buffing your frets can ensure they wear evenly, and will prevent sharp spots building up, which can easily break strings.
If you ever hear a creaking noise from your strings whilst tuning your guitar, it just means the string is getting caught in the nut. This can make tuning more difficult and will mean your guitar will probably need to be tuned more frequently, it can even cause strings to break.
This will ease the passing of the string through the nut slot, meaning your tuning will be smooth and without any creaking noise. If this does not resolve your issue, the nut slots may be too narrow for your strings and may need to be re-filed; this is a job best left to a professional. This is common if you’ve recently changed which string gauge you’re using, and is easily remedied with any good set-up.
If you’re having issues, there could be a number of reasons why your guitar is frequently going out of tune. The machine heads, nut and saddle as well as strings and their installation are all common causes of tuning problems on a guitar.
Make sure you have a good understanding of how to change your strings, we have some great resources on our blog to help you, or reach out to us if you need some extra tips!
Here are some common issues to check at the machine heads first, and below are some further tips for different guitar styles.
For Acoustic Steel String Guitars:
For Classical Nylon-String Acoustic Guitars:
This should be the final step of any string change, and taking the time to stretch your strings can save you a lot of time re-tuning as they settle in. Carefully pulling on your strings helps remove the slack at the machine head, it will mitigate some of the natural flexing, and on an acoustic guitar it also helps to settle the string into the sound board.
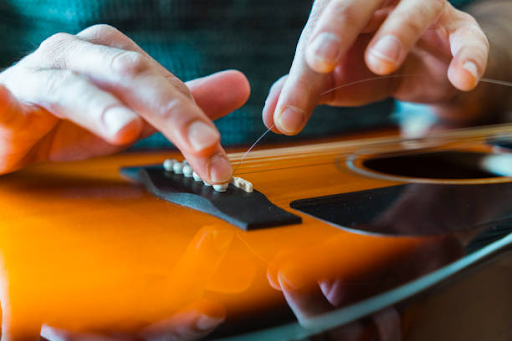
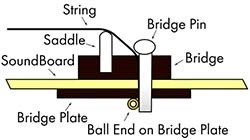
For steel string acoustic guitars with bridge pins, place one finger over the bridge when stretching the strings. As you pull on the string you may notice the ball-end slip beneath the pins, that's a good sign as the ball-end should be against the guitar top (sound board). Re-tune that string and repeat the stretching process.
General cleanliness will go a long way to help your guitar last a long time, but with any normal use the hardware will eventually start to wear from sweat and the natural oils we produce from our hands. If your guitar has metal hardware, you’ll eventually notice rust and grime buildup. This is totally normal, but isopropyl alcohol and a stiff cotton bud is enough to handle most cleaning for general maintenance, and a gentle, patient hand will keep your hardware sparkling.
We have some fantastic resources on our website to help you with set up, adjusting your truss rod, setting your action and intonation, plus string-change info on various bridge types (including correct Floyd Rose setup!). If you’re having issues in any of these areas please feel free to contact our helpful team and we’ll do all we can to assist you.
