How to Troubleshoot a Guitar Effects Pedal

Guitar pedals are an incredible tool for any guitarist, and a multitude of tones and utilities are now more affordable and accessible than ever. It is great fun to collect your favourite stompboxes and craft your personal sound with your own pedal board, but what happens when you kick your favourite stompbox on and… nothing? We’ll help you find the most common causes, and how to resolve these issues. 

Before you tear apart your board in search of the culprit, lets start with identifying the basic connection requirements for any pedal to function:

  1. Input Signal: ¼” guitar cable input
  2. Output Signal: ¼” guitar cable output
  3. Power Supply Input: Usually 9V DC or a 9V battery, we’ll touch on this later
  4. Volume / Level: It might sound silly, but even the most experienced players among us have made the mistake of not checking the volume is turned up on the Guitar, Amp, or the Pedal, so it’s worth double-checking! 

These will be found on just about every guitar pedal, and if any of the above points are missed or faulty then you’ll have no signal to your amp, and you can even damage your pedal.
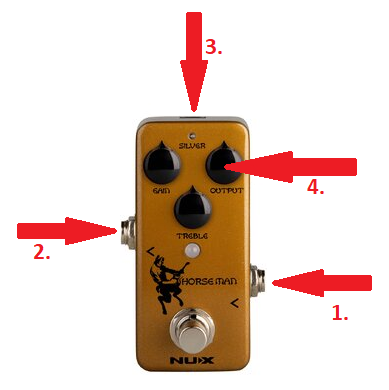
Input and Output

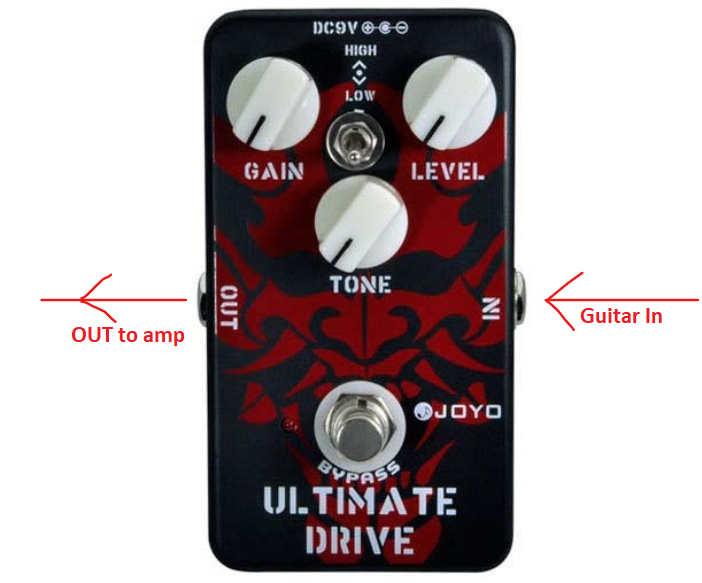
Most guitar pedals will use a standard ¼” TS-jack guitar cable for both the input and output, and some have additional routing options too. It is imperative that you ensure you have the guitar signal running into the INPUT, and the OUTPUT will run either to the next pedal in your chain, or the amplifier. Mixing up the ins and outs is more common than you might think, and with a complicated effects chain on a busy pedal board, it can be quite easy to rout a pedal backwards. Most pedals will have the input on the right-hand side, and the output on the left-hand side, but you should check your user manual if you’re not sure which is which. 
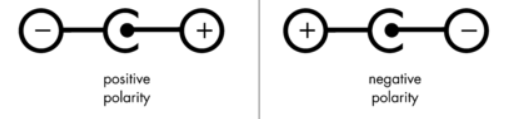
Power

The most common cause for a loss of signal is usually a power issue. There are three key elements you must always check when using any power supply with your pedals:

  • Voltage: Most pedals use a 9V power supply, and using a higher voltage than the pedal is rated for can damage your pedal. Some pedals are designed for 12V or even 18V, but if you’re not sure you must check before using the wrong Voltage supply. 
  • Polarity: Power supplies either have a positive or negative center-pin, and using the wrong polarity can also damage the pedal. Pedals usually have a polarity indicator as pictured below, you just need to make sure the polarity of your power supply polarity matches that of your pedal. 
    • If it has a “-” on the right-hand side, it's center-negative. If it has a “+” on the right-hand side, it's center-positive.
  • Current Draw: This is often measured in thousandths of an Ampere, or mA (milliamps). Analogue pedals usually use <100mA of current, whereas digital pedals like some delays or reverbs of require a higher current. Using a power supply with a higher current output than your pedal requires won’t do any harm to the pedal, but if you don’t supply enough current the pedal is unlikely to power on, and won’t operate correctly if it does.

Troubleshooting

If you have an issue with your pedal chain signal it can often be a very simple resolution to get everything connected properly again, and it’s always best to troubleshoot the basics first.

When testing your pedals, it’s ideal to limit the variables wherever possible, that’s just good science. This means first isolating the pedal from the chain to ensure we are focussed on only one variable at a time. Here are some basic pedal troubleshooting steps: 

  1. Plug your guitar directly into the amplifier, with no pedals, and ensure your amp, guitar, and both the cables you will use are all working properly
  2. Install one pedal in the chain. Make sure your power supply is connected and switched on, and your Input and Output cables are oriented correctly. Engage the pedal, do you get an effected signal from your amp?
  3. If not, you need to check your connections are solid, and ensure you’re using the correct Voltage, Current, and Polarity from your Power Supply. If you are using a 9V battery, test again with a fresh battery. All of the required power specs for the pedal should be in the user manual, and they are often printed on the back of the pedal also. If you do get a signal, congrats, your pedal is working properly and you can move on to testing the next one. 
  4. If your pedal’s power requirements are met, you have ensured your input and output cables are working properly and correctly oriented but you still get no signal then your pedal may be faulty or in need or repair. 

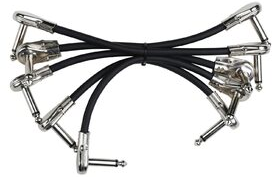
Once you have tested that your pedal is working properly, you can install it into a chain using patch cables. Patch cables are shorter in length than standard cables, and are another big cause of signal loss issues. As you install a pedal into your chain, you must make sure that the patch cable you’re using is working correctly, and for pedal boards with lots of pedals, good quality patch cables and tidy, tangle-free wiring is a must if you want to ensure longevity and reliability. 

Now you know how to power and connect your pedals, and when something goes wrong you should be able to identify which pedal is causing the problem and do your best to resolve it!

Remember, to test if any guitar pedal is working you must:

  • Check your Input and Output cable orientation
  • Ensure the Voltage, Current, and Polarity requirements of the pedal are met
  • Check the volume on your guitar, pedal, and amplifier
  • Isolate the pedal and test your cables, guitar, and amplifier 
  • Check your patch cables and keep a tidy pedalboard


Leave a comment

Comments have to be approved before showing up