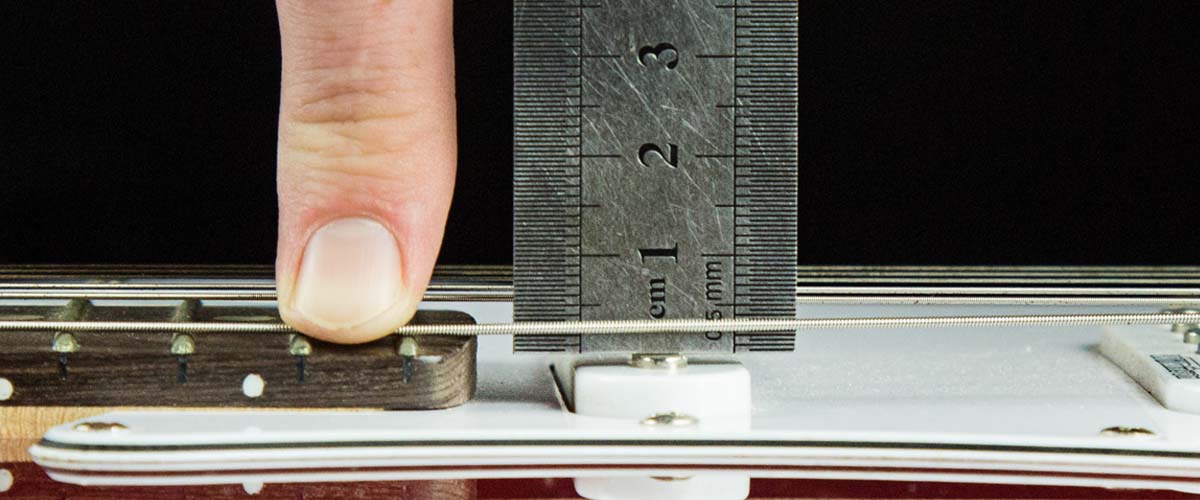
The technique is simple: fret the low E string at the last fret and measure the distance between the bottom of the string and the pickup’s magnetic pole piece. Then, use the same method on the high E string to check the treble side of the pickup.

Author: Rory Brady Date Posted:4 December 2020
The purpose of adjusting your guitar’s pickup height is to achieve the best possible tone.
If the pickups are set too low, your tone may sound thin or have lower output than desired.
If the pickups are set too high, they may interfere with the strings, affecting both tone and playability.
Pickups are essentially magnets, so if they sit too close to the strings, they can pull the strings down, causing intonation and tuning issues. Another potential problem is magnetic interference, commonly referred to as Wolftones.
Wolftones are unwanted overtones that occur on certain notes across the neck. They can be caused by a variety of factors, such as loose screws, uneven saddles, or pickup height. Specifically, if the magnetic field from a pickup interferes with the string’s vibration, it can produce these unwanted tones.
Some players roll off the volume or tone pot to create a lower-output rhythm tone. When switching to a solo or lead part, they increase the volume or tone to full, giving their sound more presence and allowing it to cut through the mix.
Others prefer lower-output pickups for a thinner, more subtle sound. If you want a softer signal from your humbuckers, lowering the pickups can help achieve this.
Another option is to set the bridge pickup higher to act as a natural boost, making it cut through the mix when selected.
The best approach is to experiment with different settings to see what works best for your playing and tone preferences.
Here’s our step-by-step guide on how to adjust your pickups for optimum tone!
You’ll want to use a metal precision ruler or action gauge to get accurate measurements. You’ll also need a screwdriver that fits the adjustment screws on your pickups.
The technique is simple: fret the low E string at the last fret and measure the distance between the bottom of the string and the pickup’s magnetic pole piece. Then, use the same method on the high E string to check the treble side of the pickup.
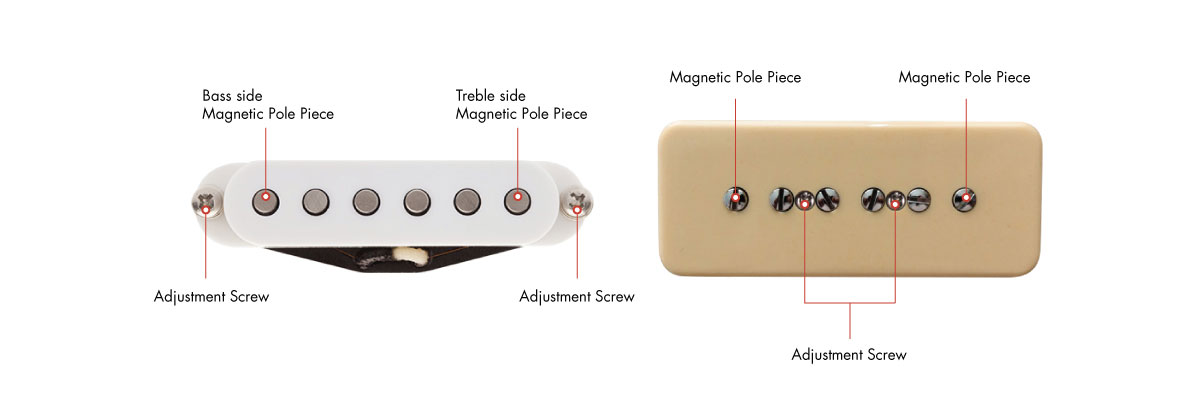
It’s important to know which way to adjust the screws. When looking down at the pickup adjustment screws:
Turn clockwise to raise the pickup
Turn counterclockwise to lower the pickup
| Single-Coil Pickup Height | Bass side: 2mm | Treble side: 1.6 mm |
|
Humbucker Pickup Height |
Bass side: 2.4mm | Treble side: 2.4mm |
| P90 Pickup Height: | Bass side: 1.6mm | Treble side: 1.6mm |
The goal is to achieve balanced output across all pickups, though this can vary depending on your playing style and pickup setup. For example, if you tend to pick or strum closer to the bridge pickup, its output may naturally be louder than the neck pickup. In that case, you might need to raise the neck pickup slightly higher to achieve balance.
There are also situations where you might want one pickup to have a higher output. For instance, on an HSS Guitar, you may want the humbucker to act as a boost, in which case the outputs wouldn’t be balanced. Ultimately, this comes down to personal preference, so listen carefully when making adjustments.
IMPORTANT NOTE:
Make these adjustments while in your playing position, using a screwdriver to turn the adjustment screws. This ensures the pickup height reflects how it will actually sit and sound when you play, giving you the most accurate results.
You might not get it perfect the first time, and further adjustments may be needed. Once you’ve made your initial changes, play the guitar, listen carefully, and try all pickup positions. Keep fine-tuning until the sound feels right to you!
Thanks for reading this blog! to give you even more great content, check out our pages.
Join our newsletter for tips, advice, new products, and great deals
Visit our YouTube channel for some great Demo’s & Tutorials
Our Facebook page for updates and specials and more
I hope this article has helped. if you need any assistance please email:
sales@artistguitars.com.au or call us on 1300 489 816
© Artist Guitars 2020
